- FAQs
-
Tutorials
Product Tutorials
- AV Voice Changer Software Product
- Voice Changer Software Diamond 9
- Voice Changer Software Diamond 8
- Voice Changer Software Diamond 7
- Voice Changer Software Gold 7
- Voice Changer Software Basic 7
- AV VoizGame 6
- AV Music Morpher Products
- Music Morpher
- Music Morpher Gold
- Video & Webcam Products
- AV Video Morpher
- AV Webcam Morpher
Freeware Tutorials
- AV MP3 Player Morpher
- AV RingtoneMAX
- AV DVD Player Morpher
- AV Video Karaoke Maker
- AV Digital Talking Parrot
- AV Tube
- AV MIDI Converter
- Media Player Morpher
- Media Player Morpher
- AV Audio Converter
- AV Audio & Sound Recorder
- AV Audio Editor
- AV Audio Morpher
- AV CD Grabber
- AV Media Uploader
- AV Video Converter
General Tutorials
- Update log
- Add-ons
- Forum
- Press releases
Customer Login
- Improve the quality of songs
- How to use the combined Voice Remover-Extractor
- Extract Voice From A Song
- Remove Voice from Music in a Song
- July 4Th_Sing ''Americ Will Always Stand'' With Randy Travis
- Mother’s Day - Make A Music Gift For Your Mom
- How To Create A Voice Over
- How To Record Your Voice using Music Morpher Gold 4.0
How to use the combined Voice Remover-Extractor
(3.0 out of
5
based on
2 votes)
| Click on the steps below to start | Expand all | Collapse all |
- Click on the Morpher tab on the module bar to open the Morpher module.
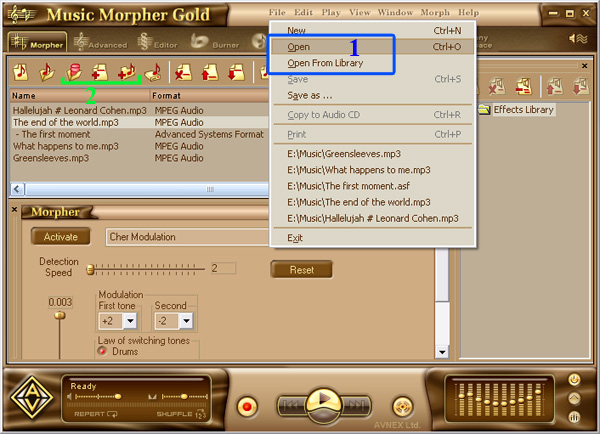
- To open a file, click File on the menu bar and choose Open or Open From Library (1).
- The Open dialog box will come up; select the audio file you want to open.
- Or use Open From Library, Add Files to Playlist, or Add Folder to Playlist button (2) to open files.
- Play the song by clicking the Play button on the Player panel.
Remember to turn on the Equalizer to enhance the sound of the music.
To adjust all the bands to your taste or choose an available preset, choose any of the Presets buttons.

- Press the Active button under the playlist box.
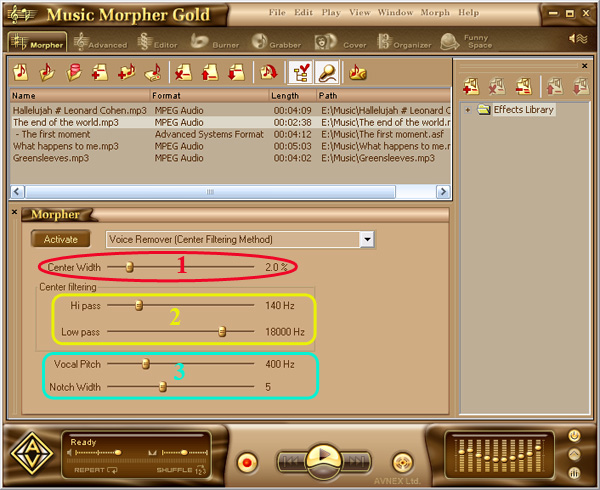
Open the list on the right of the button and choose Voice Remover. There are 3 main control elements.

- Center Width (1): This is the width of the range of the voice that will be analyzed. This parameter is made by analyzing the difference between the right and the left channel. The more you move this slider to the right, the more the voice is removed, so move it slowly until you're satisfied with the result.
Note: This is the most powerful parameter, as it will strongly affect how much sound and voice is removed.
- Center filtering (2) will have 2 sliders: The High Pass Filter slider and the Low Pass Filter slider. The High Pass filter setting will decide how much sound will be left intact. The more you move this slider to the left, the more voice is removed. This parameter has the most effect on the total sound of a song. The Low Pass Filter works in the opposite way, and its main benefit is reducing the noise. Sometimes, after you adjust this parameter, the remaining voice (which isn't processed) creates some noise in the song, so move this slider to the right to remove more noise and to the left to keep more of the original sound.
- Vocal Pitch (3): This is the last element of the voice remover. The more accurate your adjustment is, the better the result. By moving this slider, you will select the fundamental frequency of the singer's voice signal. Music Morpher Gold will build up a library of formant frequencies for that voice and remove the sound on those frequencies. The frequencies on either side of the selected frequencies will be kept. Please listen to the music carefully while you move the slider, and stop when you hear that most of the main voice has been removed.
- After that, move the Notch Width to the right to remove more sour to the left to add more sound. A setting of 8 may be the best.
Note: The vocal pitch of male singer is around 250Hz, and vocal pitch of female singer is around 720Hz. You can use the left or right button on the keyboard to move the slider more accurately.
- Once everything is OK, press the Morph Selected Files button on the toolbar to morph the song.
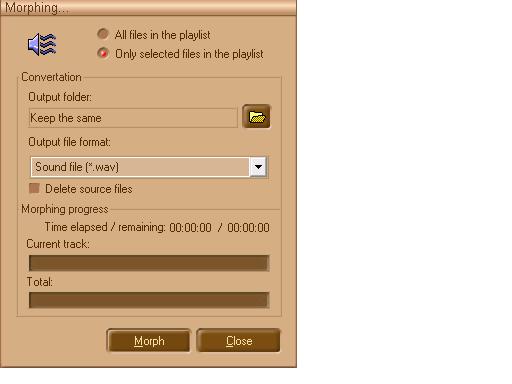
The Morphing dialog box will come up. Define the output folder and the output file format for your song, and then press Morph to begin the morphing process.

Note: The quality of any removed or extracted file depends on how that particular song was recorded and mixed. Sometimes vocals are recorded in a stereo field in such a way that prevents removal. If songs are recorded in this way, their vocals cannot be removed at all. This is why some vocals can be removed and some cannot. Therefore, users should not expect this software to remove vocals 100% of the time. In most cases, however, it will successfully remove vocals. Sometimes it might sound as if the vocal has not been completely removed; however when the user inserts their own voice, or if the file is then used as a karaoke tune, the listeners will only hear the new voice along with the original music.
Subscribe newsletter
- Product using tips
- Free gifts
- Special discount offers
