- FAQs
-
Tutorials
Product Tutorials
- AV Voice Changer Software Product
- Voice Changer Software Diamond 9
- Voice Changer Software Diamond 8
- Voice Changer Software Diamond 7
- Voice Changer Software Gold 7
- Voice Changer Software Basic 7
- AV VoizGame 6
- AV Music Morpher Products
- Music Morpher
- Music Morpher Gold
- Video & Webcam Products
- AV Video Morpher
- AV Webcam Morpher
Freeware Tutorials
- AV MP3 Player Morpher
- AV RingtoneMAX
- AV DVD Player Morpher
- AV Video Karaoke Maker
- AV Digital Talking Parrot
- AV Tube
- AV MIDI Converter
- Media Player Morpher
- Media Player Morpher
- AV Audio Converter
- AV Audio & Sound Recorder
- AV Audio Editor
- AV Audio Morpher
- AV CD Grabber
- AV Media Uploader
- AV Video Converter
General Tutorials
- Update log
- Add-ons
- Forum
- Press releases
Customer Login
- How to use Webcam Morpher in QQ?
- Record your real webcam video with Webcam Morpher
- Share your favorite video clips with chat friends via webcam
- How to use Webcam Morpher in Camfrog? (Video)
- How to create your own nickfaces by using AV Nickface Maker? (Video)
- Share your favorite video clips with chat friends via webcam (Video)
- How to make your webcam image more attractive while surfing on iGoogle.com with Webcam Morpher 2.0
- How to change webcam while working on CustomVideoChat.com of IVideoChat.com with Webcam Morpher 2.0
Record your real webcam video with Webcam Morpher
(5.0 out of
5
based on
18 votes)
INTRODUCE:
The built-in Recorder of AV Webcam Morpher can help you record your real Webcam video and save into different formats.
Steps to take:
| Click on the steps below to start | Expand all | Collapse all |
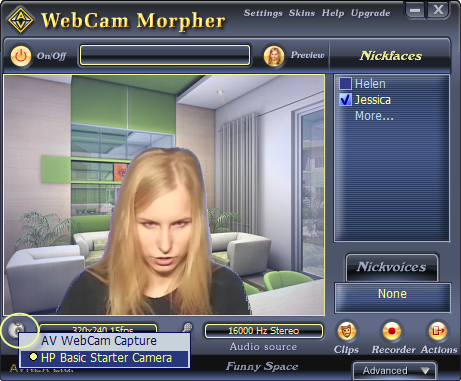
On the Webcam Morpher 2.0 main panel, click on Webcam Source button and select your Camera’s name in the list.
E.g: In the below illustration, the camera's name is HP Basic Starter Camera.

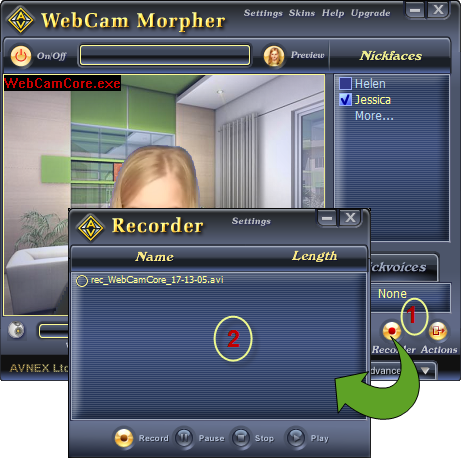
Click on the Recorder button (1) to open the Webcam Morpher’s built-in Recorder (2).

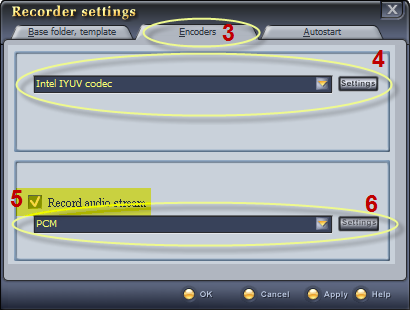
- Switch to Encoders Tab (3) and open the Setting button (4) for appropriated video codec.
- The Intel IYUV codec is highly recommended.
- Check on Record audio stream (5) if you want the audio to be recorded, too.
- Click on the Settings button (6) for appropriated audio codec. And, PCM codec is always recommended.
- Click OK to apply your settings.
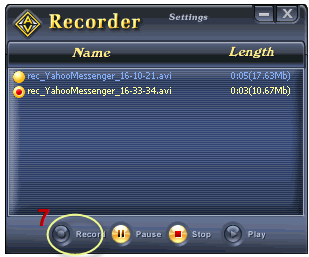
You can now start recording all that you see with your real webcam.

- Click the Record button (7) to start the recording process. Click Pause and Stop to pause and stop your recording when necessary.
- By default, your recording files will be kept in the My Document folder.
For more detail on how to change other settings of WCM Recorder, click here.

Subscribe newsletter
- Product using tips
- Free gifts
- Special discount offers
