- FAQs
-
Tutorials
Product Tutorials
- AV Voice Changer Software Product
- Voice Changer Software Diamond 9
- Voice Changer Software Diamond 8
- Voice Changer Software Diamond 7
- Voice Changer Software Gold 7
- Voice Changer Software Basic 7
- AV VoizGame 6
- AV Music Morpher Products
- Music Morpher
- Music Morpher Gold
- Video & Webcam Products
- AV Video Morpher
- AV Webcam Morpher
Freeware Tutorials
- AV MP3 Player Morpher
- AV RingtoneMAX
- AV DVD Player Morpher
- AV Video Karaoke Maker
- AV Digital Talking Parrot
- AV Tube
- AV MIDI Converter
- Media Player Morpher
- Media Player Morpher
- AV Audio Converter
- AV Audio & Sound Recorder
- AV Audio Editor
- AV Audio Morpher
- AV CD Grabber
- AV Media Uploader
- AV Video Converter
General Tutorials
- Update log
- Add-ons
- Forum
- Press releases
Customer Login
- DLL File is missing? Cannot start Media Player Morpher
- Fix background noise/echo problem when using Voice Changer Software
- Download purchased software using FlashGet on Google Chrome browser
- Download purchased software using Internet Download Manager on Google Chrome browser
- Download purchased software on Google Chrome browser
- Troubleshoot the download
- Download purchased software using Internet Download Manager on Opera browser
- Could not open Installation Logs file?
Fix background noise/echo problem when using Voice Changer Software
(3.9 out of
5
based on
75 votes)
| Click on the steps below to start | Expand all | Collapse all |
- You are getting irritated by the background echo while using Voice Changer Software on calls via VoIP apps like Skype/Discord/Twitch… and the other end is unable to hear you clearly.
Or
- Right after launching Voice Changer Software, noise starts and builds up in feedback loops until it reach the max volume level.
| ♫ Noise may sound like: |
The above sound problems might occur due to many different reasons:
1. The VoIP applications or communicators you are using have not been tested yet and may not work compatibly when using along with Voice Changer Software.
2. Using built-in microphone or separate microphone and speakers can cause howling/buzzing symptoms.
3. Other program(s) on your computer also requires a virtual driver which conflicts with AV Virtual Audio Driver.
4. Failed or corrupted installation of AV Virtual Audio Driver/AV Voice Changer Software.
5. There may be infected or defective file(s) that prevents your computer from being in perfect condition.
Please select appropriate solutions below in accordance with your computer’s status:
1. Check your microphone or headset:
- It is recommended to use a normal headset plugged directly into your sound card’s ports.
- If you are using separate microphone and speakers, please keep the microphone as far as possible away from the speakers and as close as possible to your mouth.
- Do not forget to disable your built-in microphone if you are already using an external headset.
- Try updating your hardware driver, especially sound card driver.
2. Adjust PC’s Sound Settings:
- Right-click on the speaker icon at the bottom-right of your desktop screen » Choose Playback devices. Make sure your main speakers is set as default device.
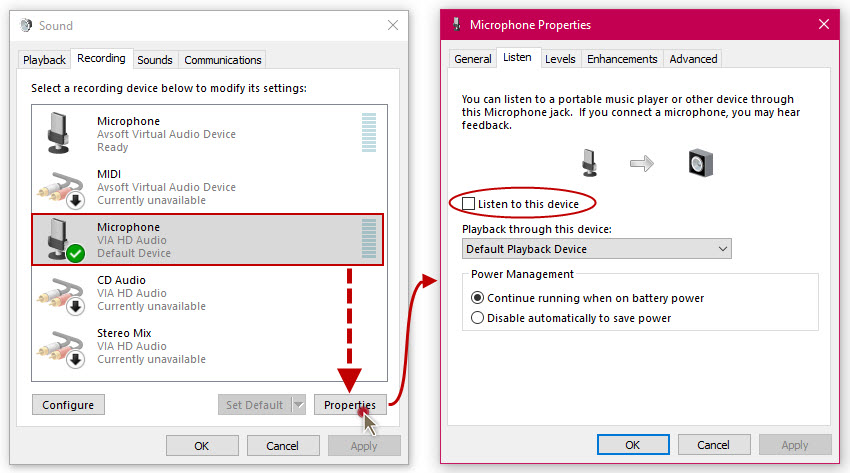
- Switch to Recording tab » Click on your Microphone » Choose Properties » Go to Listen tab » Make sure Listen to this device is NOT ticked » Click OK to apply changes and close Sound Dialog box.
3. Take advantage of Voice Changer Software Diamond’s advanced features
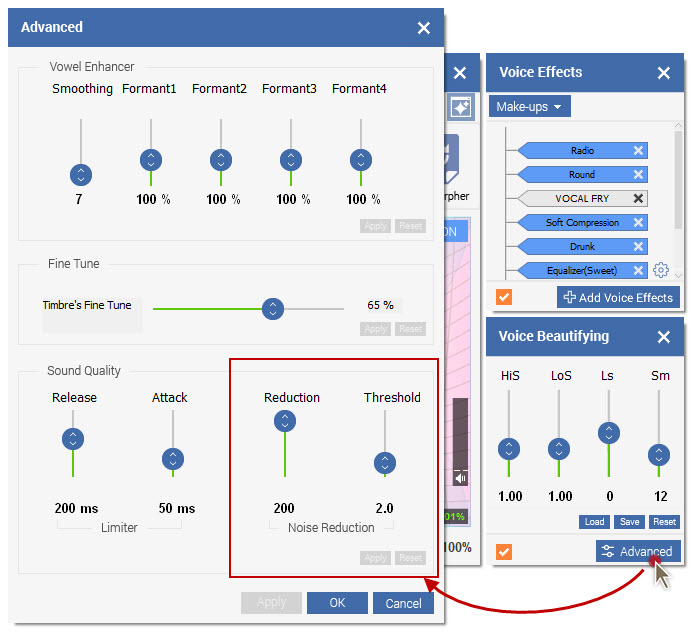
Voice Changer Software Diamond users can also use Noise Reduction in Advanced settings to reduce extra noise:
Run Voice Changer Software Diamond » In Voice Beautifying panel, click on Advanced. Find Noise Reduction in Sound Quality section. Further information can be found here (Step 3).
4. Manually reinstall AV Virtual Audio Driver
- Start » Control Panel » Device Manager (icon view) » Expand Sound, video and game controllers list » Right-click on Avsoft Virtual Audio Device » Uninstall
- Reboot your computer
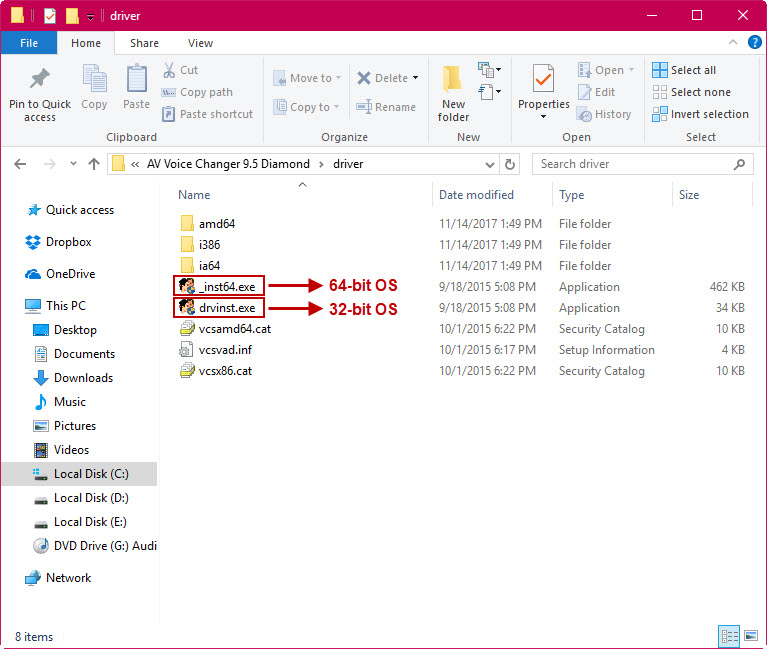
- Manually install AV Virtual Audio Device: Right-click on a Voice Changer Software shortcut » Choose Properties » In Shortcut tab, select Open File Location » Choose Driver folder » Right-click on drvinst.exe (32-bit OS) or _inst64.exe (64-bit OS) » Run as Administrator » Wait till the MSDOS window automatically close.
5. Make clean uninstall of Voice Changer Software before install the latest build
After removing Voice Change Software from your PC, search and manually delete the related files/folders in the following locations:
- Installation folder: Go to C:\ and C:\Program Files or C:\Program Files (x86)
- AppData folder: Go to Start » Run » Type in %appdata%
- Registry Editor: Go to Start » Run » Type in regedit » In Registry Editor window, seek especially in HKEY_LOCAL_MACHINE and HKEY_CURRENT_USER
If the problem persists, simply contact our Support Team for further assistance.
Subscribe newsletter
- Product using tips
- Free gifts
- Special discount offers