- FAQs
-
Tutorials
Product Tutorials
- AV Voice Changer Software Product
- Voice Changer Software Diamond 9
- Voice Changer Software Diamond 8
- Voice Changer Software Diamond 7
- Voice Changer Software Gold 7
- Voice Changer Software Basic 7
- AV VoizGame 6
- AV Music Morpher Products
- Music Morpher
- Music Morpher Gold
- Video & Webcam Products
- AV Video Morpher
- AV Webcam Morpher
Freeware Tutorials
- AV MP3 Player Morpher
- AV RingtoneMAX
- AV DVD Player Morpher
- AV Video Karaoke Maker
- AV Digital Talking Parrot
- AV Tube
- AV MIDI Converter
- Media Player Morpher
- Media Player Morpher
- AV Audio Converter
- AV Audio & Sound Recorder
- AV Audio Editor
- AV Audio Morpher
- AV CD Grabber
- AV Media Uploader
- AV Video Converter
General Tutorials
- Update log
- Add-ons
- Forum
- Press releases
Customer Login
- Trillian Voice Changer, Voice Changer Software Basic, Tutorials, Using Voice Morpher, Voice Effects
- Change voice in Brosix with Voice Changer Software
- Using AV Voice Changer Software with Corel VideoStudio Pro X3
- Mohawk Voice Changer, Voice Changer Software, Tutorials, Using Voice Morpher, Voice Effects
- Using AV Voice Changer Software with Sony ACID Music Studio 7.0
- VCS 7 Recorder - Save audio file in WAV format (Video)
- How to use AV Voice Changer Software with Ustream TV
- EVE Online Voice Chat - How To Change Your Voice in VCS 7.0
Change voice in Brosix with Voice Changer Software
INTRODUCTION
This tutorial will guide you through the way to set up Voice Changer Software Basic 7.0 to change your voice in Brosix's voice chat session.
Brosix is a secure Instant Messaging and collaboration tool, ideal for everyday communication for business and leisure.
Two different versions of Brosix:
1. Brosix Enterprise is a paid service that is based on the number of users in your private network. Try a FREE 30-Day Trial of the Brosix Enterprise IM program before subscribing to the service.
2. Brosix Personal is a FREE version of Brosix that allows individuals to utilize all the benefits of Brosix Enterprise without the cost.
» Notes:
• This tutorial is applicable for all editions of Voice Changer Software 7.0.
• This tutorial was illustrated using Voice Changer Software Basic 7.0 in Vista skin (VCS7 in short) and Brosix
• Users should have known how to change voice using Voice Morpher feature, and other voice changing features of VCS
Steps to take
| Click on the steps below to start | Expand all | Collapse all |
On VCS7 main panel, click Preferences to open the Preferences dialog box.
![Voice Changer Software Basic 7 Fig 1: VCS Basic 7 [Main Panel]](http://support.audio4fun.com/images/stories/vcs-tut/April2011/vcs_1.png)
In the Preferences dialog box, we will change Hook mode to Virtual Audio Driver mode.
- Check VadMode (1).
- Click OK button (2) to apply the new setting and close the Preferences dialog box.
![Voice Changer Software Basic Fig 2: Voice Changer Software Basic [Preferences]](http://support.audio4fun.com/images/stories/vcs-tut/April2011/vcs_2.png)
Return to VCS7, choose morphing effects for your voice, and make adjustments until you are satisfied with output voice.
Note: You should have known how to change voice using Voice Morpher feature, and other voice changing features of VCS.
- Go to in main panel![VCS Basic with Brosix Main Panel Fig 3: VCS Basic with Brosix [Main Panel]](https://support.audio4fun.com/images/stories/vcs-tut/June2011/Brosix/brosix%20-%20main%20panel.png)
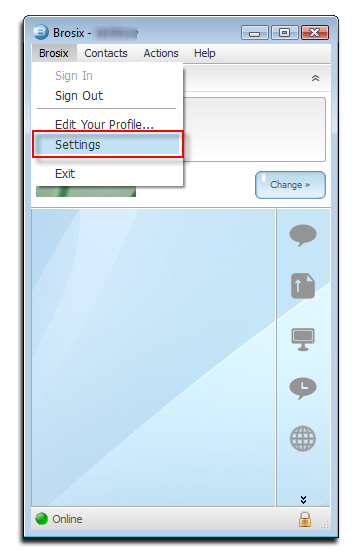
- Go to Brosix Menu >> Select Settings command

- In Settings Windows >> Go to (1) Plugins >> Select (2) Audio and Video command >> Click on (3) Settings button to open Audio and Video settings windows

- In Audio and Video settings >> Select Audio input device: Microphone (Avnex Virtual Audio) >> Click on OK to apply setting.
![VCS Basic with Brosix [Audio and Video settings] Fig 6: VCS Basic with Brosix [Audio and Video settings]](http://support.audio4fun.com/images/stories/vcs-tut/June2011/Brosix/brosix_audio_video_settings.png)
You can now start voice chatting on Brosix. The morphing settings for your voice will be applied automatically.
Subscribe newsletter
- Product using tips
- Free gifts
- Special discount offers
