- FAQs
-
Tutorials
Product Tutorials
- AV Voice Changer Software Product
- Voice Changer Software Diamond 9
- Voice Changer Software Diamond 8
- Voice Changer Software Diamond 7
- Voice Changer Software Gold 7
- Voice Changer Software Basic 7
- AV VoizGame 6
- AV Music Morpher Products
- Music Morpher
- Music Morpher Gold
- Video & Webcam Products
- AV Video Morpher
- AV Webcam Morpher
Freeware Tutorials
- AV MP3 Player Morpher
- AV RingtoneMAX
- AV DVD Player Morpher
- AV Video Karaoke Maker
- AV Digital Talking Parrot
- AV Tube
- AV MIDI Converter
- Media Player Morpher
- Media Player Morpher
- AV Audio Converter
- AV Audio & Sound Recorder
- AV Audio Editor
- AV Audio Morpher
- AV CD Grabber
- AV Media Uploader
- AV Video Converter
General Tutorials
- Update log
- Add-ons
- Forum
- Press releases
Customer Login
- AV Voizgame - Change voice in Counter Strike Game
- AV Voizgame - Change voice in Steam Game Portal
- VoizGame - How to change voice while working on Mumble
- VoizGame - How to talk like Yoda in Star Wars Movie
- VoizGame - How to talk like Traxex the Drow Ranger in WarCraft III
- How to talk like Optimus Prime robot in Transformer movie
AV Voizgame - Change voice in Steam Game Portal
(3.3 out of
5
based on
4 votes)
The new version of AV VoizGame has a Virtual Audio Driver ( Avnex Virtual Audio Device) which works as a virtual audio & sound device. This device can be used with any VoIP, Instant Messenging applications, or online voice chatting or web conferencing websites for changing voice and/ or recording in real-time. By setting AVnex Virtual Audio Device as default audio driver for microphone in those applications, you will be able to control your voice tone and speak the way you want.
>> About Steam
Steam is a digital distribution, digital rights management, multiplayer and communications platform developed by Valve Corporation. It is used to distribute games and related media online, from small independent developers to larger software houses.
Steam also has community features, automated game updates, in-game voice and chat functionality.
In this tutorial, we will guide you on how to make appropriate settings on Steam for changing voice in games which work on this platform.
| Click on the steps below to start | Expand all | Collapse all |
- Run Steam >>In Steam menu >> Select Settings command
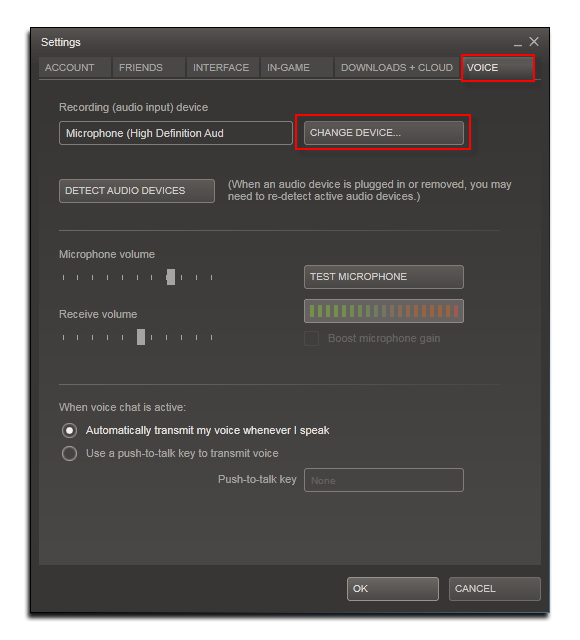
- In Settings dialog box >> Go to VOICE tab >> Click on CHANGE DEVICE

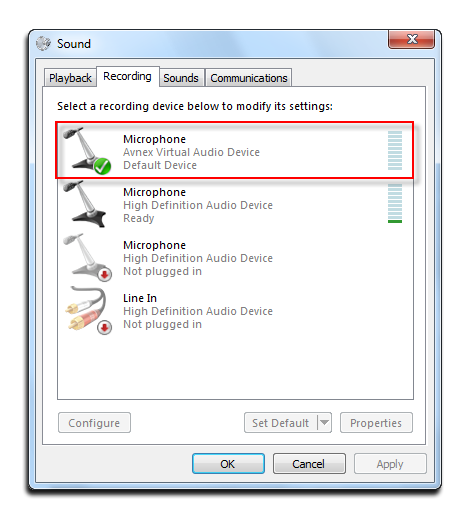
- When Sound dialog box of Windows comes out, switch to Recording tab >> Select Microphone (Avnex Virtual Audio Device) >> Click OK

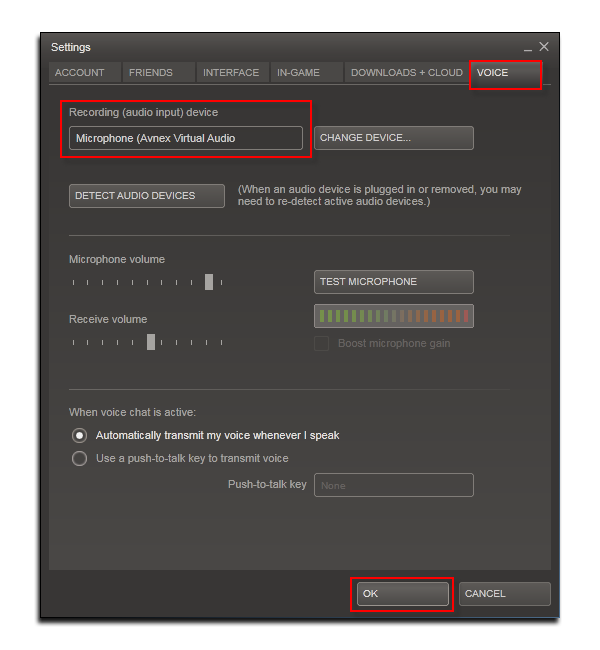
- Back to Steam’s Settings, check if Microphone (Avnex Virtual Audio Device) has already been set as Recording (audio input) device >> Click OK

- You can now start voice chatting on Steam Games.
>> Click here to learn how to change voice in Counter Strike using AV Voizgame.
Note: The morphing settings for your voice will be applied automatically. Make sure that AV Voizgame is always turned on as long as you want to speak with the changed voice.
Subscribe newsletter
- Product using tips
- Free gifts
- Special discount offers
