- FAQs
-
Tutorials
Product Tutorials
- AV Voice Changer Software Product
- Voice Changer Software Diamond 9
- Voice Changer Software Diamond 8
- Voice Changer Software Diamond 7
- Voice Changer Software Gold 7
- Voice Changer Software Basic 7
- AV VoizGame 6
- AV Music Morpher Products
- Music Morpher
- Music Morpher Gold
- Video & Webcam Products
- AV Video Morpher
- AV Webcam Morpher
Freeware Tutorials
- AV MP3 Player Morpher
- AV RingtoneMAX
- AV DVD Player Morpher
- AV Video Karaoke Maker
- AV Digital Talking Parrot
- AV Tube
- AV MIDI Converter
- Media Player Morpher
- Media Player Morpher
- AV Audio Converter
- AV Audio & Sound Recorder
- AV Audio Editor
- AV Audio Morpher
- AV CD Grabber
- AV Media Uploader
- AV Video Converter
General Tutorials
- Update log
- Add-ons
- Forum
- Press releases
Customer Login
How To Make An MP3 CD
INTRODUCE
This tutorial will guide you through the step-by-step process of burning your favorite audio files to MP3 CD.
STEPS
| Click on the steps below to start | Expand all | Collapse all |
Switch to the burner module by clicking the Burner button on the module bar (see the picture below).

Click the Create new data disk button on burner toolbar (see the picture below). As the result, the new compilation project will appear in a separate data CD window.

Select the audio files you want to burn in the explorer of the data CD window and drag them to the compilation pane of the data CD window. As this is going to be an mp3 disk, you can arrange your compilation files in folders and subfolders (see the picture below).

Note: Make sure that the total size of your compilation does not exceed the actual disk size - for that, check the meter at the bottom of the data CD window (see the picture below).

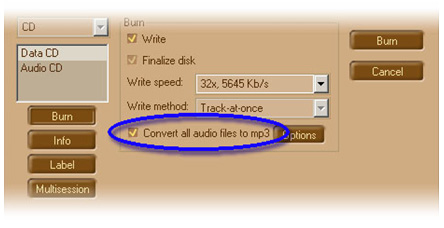
When you are ready with adding files to your new mp3 disk click the record button on the toolbar of the data CD window. In the record dialog box, make sure to select Convert all audio files to mp3 check box (see the picture below).
Optional:
- Select the preferable write speed in the Write speed combo box.
- Click the Label button and type in the label for your mp3 disk in the "volume label" edit box.
Click the Burn button (top right corner) when ready. The dialog box Record data CD will appear to show you the burning process: first, your files will be converted to mp3 format; secondly, they will be burnt to CD disk. When the process ends, click Ok on the Information message box. Now enjoy listening to your favorite mp3 songs outside the computer!
Subscribe newsletter
- Product using tips
- Free gifts
- Special discount offers