- FAQs
-
Tutorials
Product Tutorials
- AV Voice Changer Software Product
- Voice Changer Software Diamond 9
- Voice Changer Software Diamond 8
- Voice Changer Software Diamond 7
- Voice Changer Software Gold 7
- Voice Changer Software Basic 7
- AV VoizGame 6
- AV Music Morpher Products
- Music Morpher
- Music Morpher Gold
- Video & Webcam Products
- AV Video Morpher
- AV Webcam Morpher
Freeware Tutorials
- AV MP3 Player Morpher
- AV RingtoneMAX
- AV DVD Player Morpher
- AV Video Karaoke Maker
- AV Digital Talking Parrot
- AV Tube
- AV MIDI Converter
- Media Player Morpher
- Media Player Morpher
- AV Audio Converter
- AV Audio & Sound Recorder
- AV Audio Editor
- AV Audio Morpher
- AV CD Grabber
- AV Media Uploader
- AV Video Converter
General Tutorials
- Update log
- Add-ons
- Forum
- Press releases
Customer Login
How to make a ringtone with AV RingtoneMAX
(4.4 out of
5
based on
26 votes)
{jcomments on}INTRODUCTION
The ringtone making process in AV RingtoneMAX should cover 3 steps, which is designed as Wizard GUI base.
STEPS TO TAKE
| Click on the steps below to start | Expand all | Collapse all |
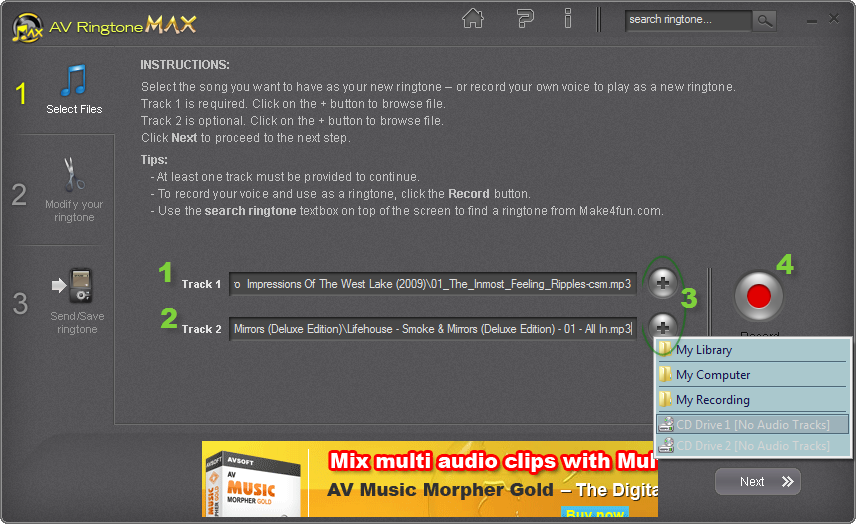
Within this step, you will have some favorable choices for input files.
First, you start adding file by clicking on the  button (3). Then, you are provided with 4 options available for input audio files:
- My Library: this folder is created during the installation of AV RingtoneMAX. And, for this very first version, we put 4 audio samples in this folder so that any user of AV RingtoneMAX can have a quick start to practise and enjoy the easy ringtone making process. The quantity of the samples may be increased in further upgrade.
- My Computer: within this option, you are able to locate any audio files from your HDD.
- My Recording: this is one of our special option which aims to help user tocreate a solo or remix ringtone with his/her vocal on it. (Learn how to use the voice recorder )
- Import audio files from CD drive: this option is one of the easiest way on earth that help you to create a ringtone by importing song from your audio CDs collection.
- After finish selecting the input files, you can click on the Next button at the bottom-right to continue with step 2.
Notice: this tutorial is working on a remix ringtone with both Track 1 and Track 2 loaded. If you want to create a solo ringtone, make sure that only one of the track is loaded with input file.
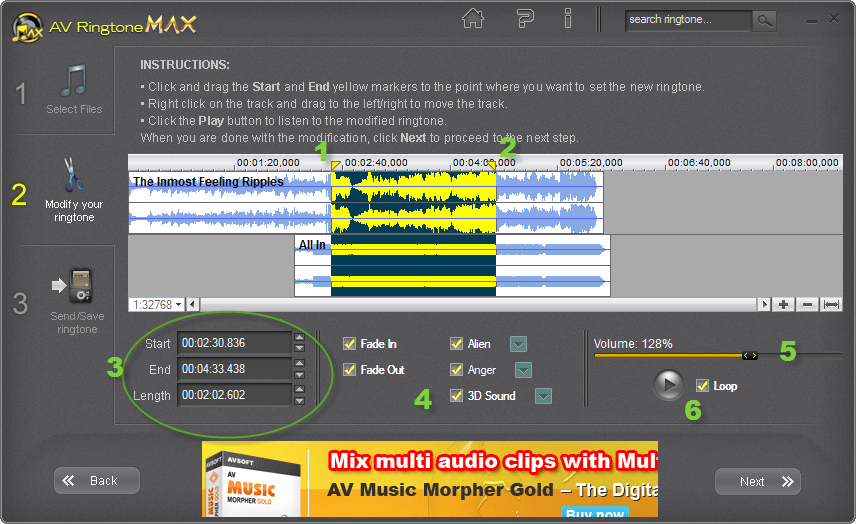
In this step, you can freely modify your ringtone with favorite portion selection and effects adding up.
You can see that it is quite easy with AV RingtoneMAX when you are able to move the Start point (1) and End point (2) with your mouse. You are even able to manually and accurately adjust the timing with the Start, End and Length timing box (3).
You can also drag the audio tracks left/rigth the timeline by holding the Right-mouse button.
If you are a ringtone effects Guru,the Fade in, Fade out effect and 10 other effects (4) are right there for you. Another useful effect in this step is Volume, which help most in case your original audio file does not good enough.
Generally, this part is all yours, make your own favorite changes as you wish. Then, hit the Next button again to continue.
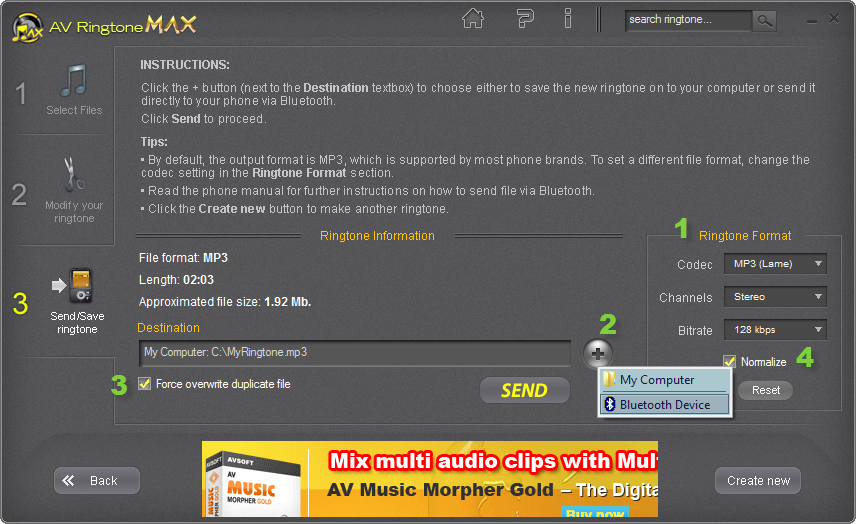
Here we go to the most excited part of the whole process - save the result and send it to your cell phone or share it with your friends.
- Select Ringtone format (1): hit the Codec box below Ringtone Format (1) to select output format for your ringtone. Then, you also decide whether it is Stereo or Mono and which Bitrate it should be at.
- Normalize option is highly recommended to improve the quality of the output. (check the definition of normalize from WIKI)
- Select Desination folder for the output result: within this selection, saving the ringtone to My Computer or Sending it to cell phone via bluetooth device are the available options. With the My Computer option, you are about to save your ringtone onto your HDD quickly and easily. And, with the Bluetooth option, it may take time for your laptop/PC to check for available bluetooth devices nearby and to send the ringtone directly to that device.
- Mark the "Force overwrite duplicate file" option if you want the program to overwrite (without asking) any duplicate file name.
With either saving way, your ringtone is now ready. Enjoy it!
Subscribe newsletter
- Product using tips
- Free gifts
- Special discount offers