- FAQs
-
Tutorials
Product Tutorials
- AV Voice Changer Software Product
- Voice Changer Software Diamond 9
- Voice Changer Software Diamond 8
- Voice Changer Software Diamond 7
- Voice Changer Software Gold 7
- Voice Changer Software Basic 7
- AV VoizGame 6
- AV Music Morpher Products
- Music Morpher
- Music Morpher Gold
- Video & Webcam Products
- AV Video Morpher
- AV Webcam Morpher
Freeware Tutorials
- AV MP3 Player Morpher
- AV RingtoneMAX
- AV DVD Player Morpher
- AV Video Karaoke Maker
- AV Digital Talking Parrot
- AV Tube
- AV MIDI Converter
- Media Player Morpher
- Media Player Morpher
- AV Audio Converter
- AV Audio & Sound Recorder
- AV Audio Editor
- AV Audio Morpher
- AV CD Grabber
- AV Media Uploader
- AV Video Converter
General Tutorials
- Update log
- Add-ons
- Forum
- Press releases
Customer Login
Sing With A Favorite Star
(2.0 out of
5
based on
1 vote)
INTRODUCT
This tutorial helps you make an audio clip of you and your favorite stars in the simplest and most effective way with AV Music Morpher 4.0.
STEPS
| Click on the steps below to start | Expand all | Collapse all |
- Open AV Music Morpher and click on the Record button on the Player panel. The Record dialog will come up.
- Open your song with another Music Player such as Window Media Player.
- Press the red button on the Record dialog to record when you begin to sing together with the singer.
Notice for time accordance.
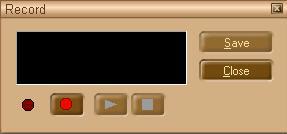
- Press the red button again to stop recording.
- Use the Play and Stop buttons to play back your recording. If you are satisfied with the result, click Save.
The Save As dialog will appear, choose the desired file name and format for your recording.
If you are not satisfied with the result, record again.
- After finishing, click the Close button to close the Record dialog.
Note: Use a quiet tight room so that extra noise cannot interfere in your recording.
- Click on the Editor tab on the module bar to activate AV Wave Editor.
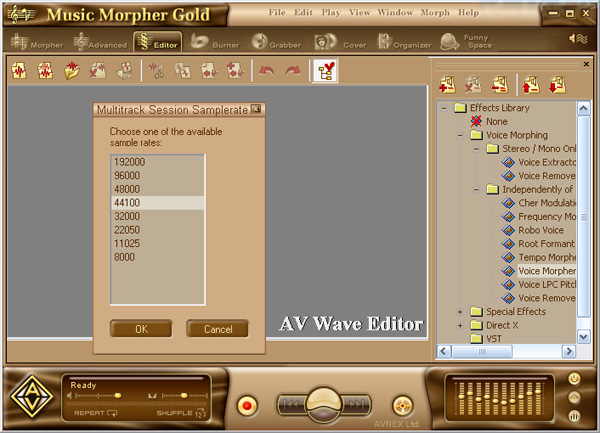
- Click on New Multi-track Session.
The Multi-track Session Sample Rate will come up.
Choose the proper rate and then click OK.
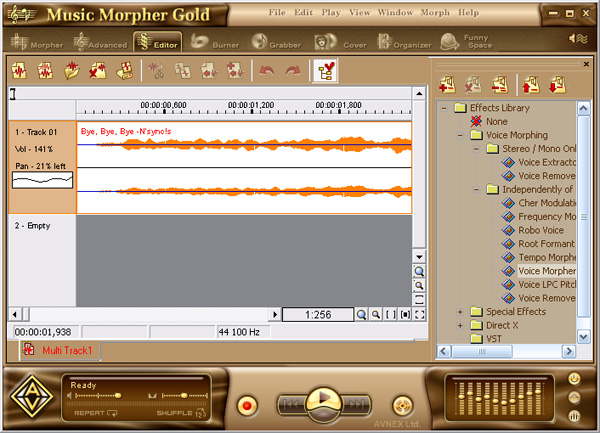
Right click to add the song to Multi-track as Track 1.
Note: To move the track backward or forward, just right click on it, drag and drop.
You can make some more adjustment to your recording or your song for better performance Right click at the track you want to adjust and choose Track Properties.

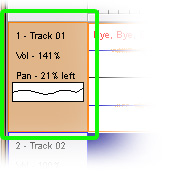
(1) Move the Volume slider (1) to adjust the volume of the track or click Mute button to mute it.
(2) Move the Pan slider (2) to adjust the volume of left and right channels. If you activate the Solo button, only this track will be heard.
(3) Adjust the equalizer to enhance the quality of sound.
(4) At (4), you can change display name of track, color of the wave line and color of the back ground for easier to examine.
At this sample, the track is named "Track 01", the wave line color is orange and back ground color is white.
You can see your settings at the left box of each track.
- Move the Quality slider to adjust the precision of main beat tracking.
- Move the Click Volume slider to adjust the volume of the drums added.
- Choose a suitable drum preset in the list.
- Check or uncheck the Freq Modulation.
- Press OK and wait a moment for the Wave Editor to morph your song.
- Play back the morphed song and see the result. Remember to choose None under the Effect Library so that song won’t be morphed twice.
- Close the file after adjusting, remember to choose Save change to… to save the change and return to the Multi-track.
Note: You can add as many effects as you like.
Click File on the menu bar and choose Save to overwrite the original copy.
Or Save as to create a new file leaving the original song intact. Now a brand new song is available for you to enjoy.
Subscribe newsletter
- Product using tips
- Free gifts
- Special discount offers