- FAQs
-
Tutorials
Product Tutorials
- AV Voice Changer Software Product
- Voice Changer Software Diamond 9
- Voice Changer Software Diamond 8
- Voice Changer Software Diamond 7
- Voice Changer Software Gold 7
- Voice Changer Software Basic 7
- AV VoizGame 6
- AV Music Morpher Products
- Music Morpher
- Music Morpher Gold
- Video & Webcam Products
- AV Video Morpher
- AV Webcam Morpher
Freeware Tutorials
- AV MP3 Player Morpher
- AV RingtoneMAX
- AV DVD Player Morpher
- AV Video Karaoke Maker
- AV Digital Talking Parrot
- AV Tube
- AV MIDI Converter
- Media Player Morpher
- Media Player Morpher
- AV Audio Converter
- AV Audio & Sound Recorder
- AV Audio Editor
- AV Audio Morpher
- AV CD Grabber
- AV Media Uploader
- AV Video Converter
General Tutorials
- Update log
- Add-ons
- Forum
- Press releases
Customer Login
Make Music Background For A Voice Presentation
(1.0 out of
5
based on
1 vote)
INTRODUCE
The Multi-track View of AV Music Morpher presents a non-destructive way of creating layered sound compositions. Multi-track View consists of numerous tracks, which you may fill with audio clips, arranging them at different timeline positions. To listen to the result you do not need to mix all the tracks down - they are played simultaneously brining the mixed sound to the output. This is extremely convenient as you can adjust your mixes on the fly by moving the clips or adding the new ones. You can also edit the waveform of each clip and apply the desired effects. Finally, when you are satisfied with the result you can mix your multi-track session down to a file.
In this tutorial, you will record a small voice presentation to a file, insert that file to a track, add some background music to another track, adjust the position and the duration of both audio clips, change the volume of your background music and finally mix all that down to a file.
STEPS
| Click on the steps below to start | Expand all | Collapse all |
- In AV Music Morpher Gold 4.0, click the button Editor to go to the Editor module.
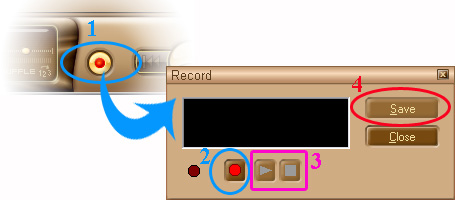
On the Player Panel, click the Record button (1) for the record dialog box to pop up.
When you get ready to recite your presentation click the Record button (2) on the record dialog box.
After finishing, click it again to stop recording.
Then click the Play, Stop button (3) to check your recording.
If you are not satisfied with the result, click the Record button (2) to record your presentation again.
Otherwise, if everything is Ok click the Save button (4) on the record dialog box.
Your voice recording will be displayed in a new waveform data window.
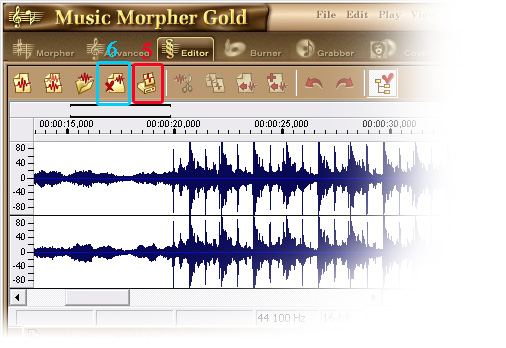
- Otherwise, click the Save button (5) on the editor module toolbar
In the Save As dialog box define the file name and the folder for your recording to be saved in.
When ready click Save.
Then click the Close button (6) on the editor module toolbar to close the waveform.
Click on “Submit Free Key” button, and then a “Get Free Key” window will be shown as below:
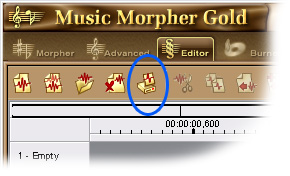
- Click the New Multi-track Session button to create a New Multi-track Session. In the dialog box set the preferable sample rate and click Ok.
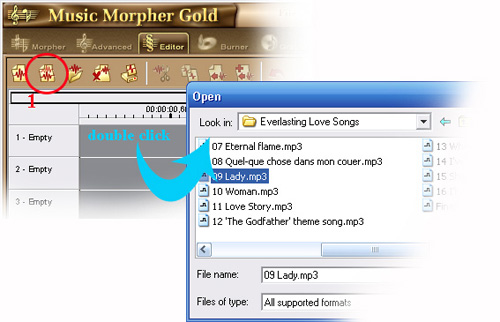
- Double click on the first track and in the Open dialog box select the audio file with your voice presentation. Click Open when ready.
- Then double click on the track below and in the Open dialog box select the file, containing your background music. Click Open when ready.
Now you have two audio clips in your Multi-track View.
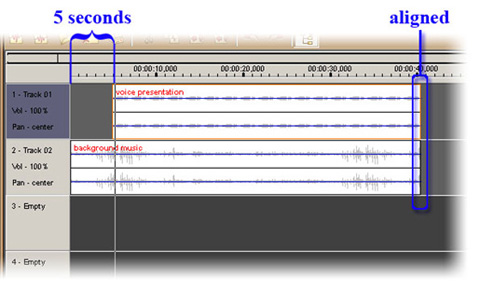
- Now you need to arrange the clips so that the voice presentation should start 5 seconds after the background music. For that, drag the background music clip to the very beginning of the track using the right mouse button.
Note: To drag a track, holding right mouse button while moving the track. Release the button to drop the track.
Then drag the clip with your voice presentation so that its left edge should start from a 5-second mark of the timeline.
- Now you need to align the ends of two clips. For that, right click on the background music clip for the context menu and select Clip properties. In the dialog box select the check box Looped and click Ok.
Position the mouse cursor over the right edge of the background music clip until the mouse changes its icon to ![]() , then resize the clip’s duration up to the end of the voice presentation. The first clip starts 5 seconds after the second with their ends aligned.
, then resize the clip’s duration up to the end of the voice presentation. The first clip starts 5 seconds after the second with their ends aligned.
- Now you can check the result – for that click the Play button on the player bar.
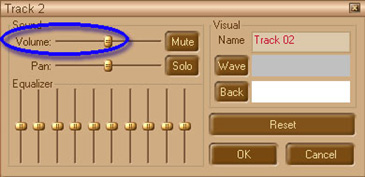
- During playback, you might hear the background music sound too loud, damping your voice presentation. To correct this problem you should decrease the volume of the track. For that, right click on the background music clip and in the context menu select Track Properties. The track properties dialog box will pop up. Drag the volume slider to reduce the volume and click Ok.
- Now click the Play button on the player bar to hear the result.
- Finally, when you are satisfied with the result, save your decorated presentation to a new audio file. For that, click the Save As button and in the Save As dialog box specify the file name, the destination path and the type for your new file. Click Save when ready.
Note:
If you choose the file type with an file extension MTS, AV Music Morpher will save your multi-track session.
From one session file you can create numerous mix-downs, each adjusted for a certain situation and saved to a specific file format.
Subscribe newsletter
- Product using tips
- Free gifts
- Special discount offers